
1-The Layout
_____________________________________________________________________
_____________________________________________________________________
The first time you open Blender you'll find a lot of stuff and you'll get confused easily.
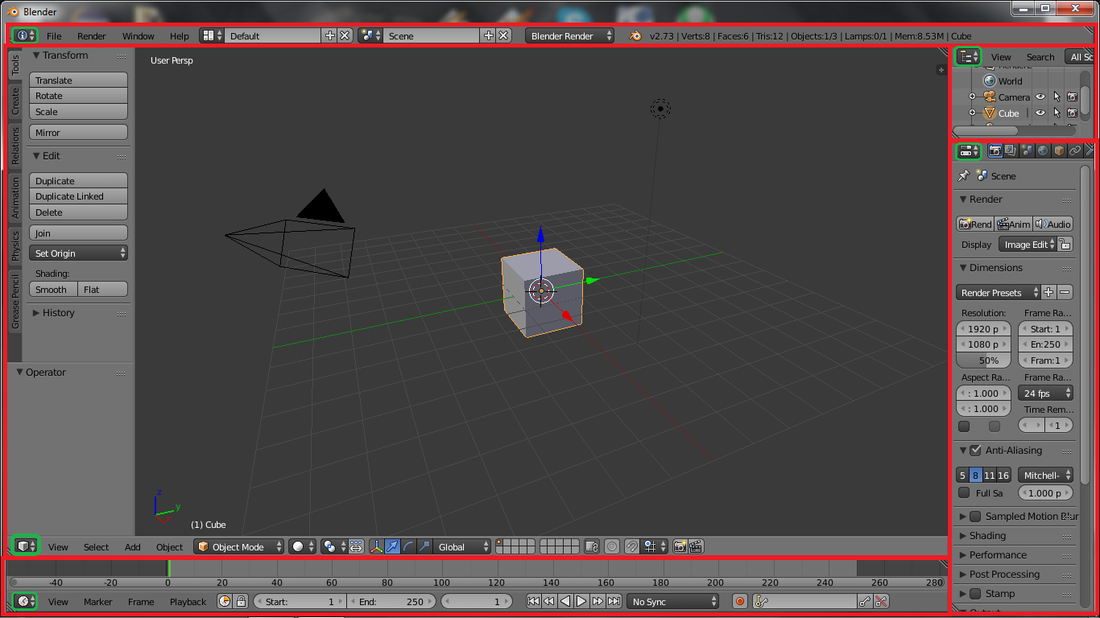
The very first thing to start using Blender is recognizing the layout. All the stuff you're watching in your screen is not everything you can do with Blender. Blender works with windows (Kinda like Gimp does), the first time you use Blender you'll have 5 different windows, and each window has a type.
(Red: Windows, Green: Types)
Every window has a header, which is the bar where the type button is located.
Feel free to click in the type button to see that there are a lot of types, and, since they are windows, you can scale them as you want, clicking in the border of the window.
Now you should recognize the 5 windows with no problem. The next step is how to add/delete windows.
Do you see those lines in the upper right/bottom left corners of every window? Click and drag down or left/up or right to make new windows!
The window at the bottom has an animation type, we won't need this (Cause we're beginners) , aim for the border between this window and the central window and right click, there you can see split or join window, select join and then select the bottom window.
That will delete the animation's window and the central window will get that space.
Well, up to now, you can create, delete, scale and change the window's type.
You should leave the windows as they are now, a 3D view (Center), Outliner and Properties windows (Right) and the info window (Top).
Every time Blender starts it'll go back to the original windows layout, you can save your actual layout in File>Save Startup File.
2-3D View
_____________________________________________________________________
_____________________________________________________________________
Now that we aren't lost anymore we can start with the 3D View (The window at the centre), Here's where all the modeling will happen.
NOTE: the red/white circle in the middle is called 3D cursor, it's harmless for now, ignore it, same goes for the arrows.
2.1 - Selecting Stuff
There should be a cube and 2 other things in the 3D View.
Right clicking an object will select it, try to select the different items. The selected item will have an orange border.
To select more things in the same selection hold shift while clicking, the selected objects will have the orange border and the last selected object will have lighter orange.
Shift clicking a selected object will deselect it.
You can select/deselect everything with A.
To select multiple items we can do 2 things:
-B -> Box selection
-C -> Circular selection (Using the mouse wheel you can scale the circle)
The circle is a light and the pyramid is a camera, since we just want to make a simple model we can select those 2, hit Delete/X and then confirm to delete them.
2.2 - Moving around
Now we should learn how to move around the scene.
Using the center click we can rotate the view.
To move the view, we can use shift+Center click.
2.3 - Basic editing
There are 3 basic actions you can do with the cube: Translate/Grab, Rotate, Scale.
You can move the cube by clicking and holding the arrows, that will move it in the axes.
In the 3D View's header there's a zone where you can see an icon with the 3 axes, an arrow, a curve, and a square with a line.
These are the 3 basic actions, clicking these buttons will toggle on/off the arrows (To move the cube), the curves (To rotate it) and the squares (To scale it). The 3 axes icon will toggle on/off all of them.
Mess around with this until you get used to it.
This only applies to editing in the axes, but you can freely do these actions.
G to grab.
R to rotate.
S to scale.
Once you press one of those keys, you'll be able to make the selected basic action, once that happens, left click will confirm the action while right click will cancel it. Besides, you can press the x, y or z keys to work along the axes, and you at the bottom left part of the 3D window you'll notice that you can see the data of the action (Ex: rotate 67,8 degrees), you can input the data simply by typing it before confirming.
Keep testing this actions until you get used to it.
2.4 - Objects
Now we'll take a look at the outliner, the window in the upper right corner. Ignore the "Render Layers" and the "World".
There you can see that we have a scene (3D View) and an object (The cube). You can select objects by clicking them and rename them by double clicking them.
Now, back to the 3D View window you can see a box at the left, this is the toolbox, you can hide/unhide it with T. All you have there can be used with shortcuts but you can leave the toolbox there if you don't know the shortcuts.
You can press the N button to unhide/hide the Viewport Properties, at the right, there's a bunch of options there too, no need to worry now.
I explained those 2 boxes just to let you know what they are, back to objects!
To create an object press Shift+A (You can use the Add menu in the toolbar) and a list of items will pop up. The only ones you will need when you start modeling will probably be the "mesh" objects.
When you create an object you can see that it appears in the Outliner.
You might notice that when you create an object it appears in the 3D cursor (The white/red circle) you can move it left clicking and you can center it with Shift + C.
2.5 - Editing an object
You should already know this but I'll explain just in case.
Objects are made of dots called vertices, they connect each other to create edges, when you fill the space between edges you get a face.
Firstly, select the cube, then go to the header and search a white ball, this sets how the object will be displayed in blender.
Set it to Wireframe and there you go! Now you can see the elements of the object. But now we need to edit them.
Near this button you can see the "Object interaction mode", change it to edit mode to be able to select the vertices of the object, you can quickly change the modes with tab.
Right clicking you can select vertices, in the header you have an option to select vertices, edges or faces.
Now we can apply all we learned before. Select vertices/edges/faces, move them, rotate them, scale them, have fun!
2-Modeling tips
_____________________________________________________________________
_____________________________________________________________________
If you've managed to get here, Congratulations! You can do a lot of stuff already!
These are some tips you should read:
-Ctrl + left click:
This will make a copy of your selection, if you have nothing selected you'll create a vertex. (Hold Ctrl to create joined vertices)
-F:
This will create a face with the selected vertices/edges.
-Some useful tools:
Extrude (E): One of the most used tools, "Extends" the object, test it yourself extruding a face.
Loop Cut and Slide (Ctrl + R): Cuts horizontally or vertically.
Knife (K): Cuts the selected face where you select.
Edge Slide (Edge menu): Slides an edge.
-Vertex/Edge/Face menu:
Shift + V/E/F
-Customizing:
You have the User preferences in the File Menu, you can change the selection click (Right or Left) and even select a theme.
3-What now?
_____________________________________________________________________
_____________________________________________________________________
Try to make something simple like a lamp and then search for videotutorials to make new stuff.
I highly recommend this Velociraptor tutorial by Jjannaway3D.
I highly recommend this Velociraptor tutorial by Jjannaway3D.
